|
How To Draw and Paint Drawgirl
|
We continue this Drawgirl tutorial by explaining and illustrating its twenty-sixth step.
 |
 |
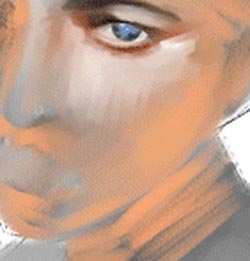
With the rendering of the eye being basically complete from the previous step of Drawgirl, the pastellist returns to painting the skin on her face in this step. S/he does so by taking a small piece of a pastel stick and laying it on its side and making horizontal and vertical strokes under her eye. The Rembrandt soft pastel stick used here is one of the light oxide red sticks (maybe 339.8, 339.9 or 339.10) I mentioned in my eBook you read (or bypassed) just before you began these tutorials. That color is also painted on the upper eyelid to enhance the upper eyelashes as discussed in the previous step. It enhances them by contrasting the brightness of light oxide red with the dark color of the lashes. The dark color could be either caput mortuum red, burnt umber, mars violet, whatever -- like I said in my eBook, this is "art not science" ladies and gentlemen. Finally, the same light color is cross-hatched by stroking vertical and horizontal lines down the length of her nose. This is in anticipation of later identifying and unifying them as the light streak down the center of her nose. Now, I would just stop here and move on to the next step, however, for your sake, I will continue for I am sure you are wondering why the artist is using an off-white color instead of a flesh color. Well, wonder no more. As a matter of fact, what I am about to explain will make this step, step 26, just about the most important step in the whole pastel portrait painting process because the information is so valuable and useful. I know when I discovered this I was overjoyed and filled with glee. In the art of painting with colored pencils (as opposed to pastel pencils), there is a technique called "burnishing" which has many definitions. One deals with the filling up of the tooth of the paper with color by pressing harder and harder with your chosen pencil color (alternating light and dark colors for each successive layer) until the surface of the paper becomes very smooth. This gives the painting a photographic type of look. And even though practically the same definition of burnishing, I am using the analogy of making color "sandwiches" so to speak, with the color white being the mayo or mayonaise. And with that colored pencil trick, I am applying it to this pastel portrait painting. First, the skin color is layed down (the bottom slice of bread), then it is covered with light oxide red (to create a mayonaise sandwich) and finally the top slice of bread is slapped on (the final layer of skin tone) to complete the sandwich. This gives the finished portrait a polished porcelain type of look. The earlier steps were the "bottom slice of bread" steps, this particular step (step 26) is the "mayo step", and the "top slice of bread" will be laid down in subsequent steps. Cute trick, don't you think? I hope you are hungry, I hope you are famished, for we are going to prepare and pile up a thick, layer by layer "Dagwood" type sandwich later on while doing her hair -- unloosen your belts and have your heartburn medicine handy. This burnishing, this creating of color sandwiches, can also be referred to as superimposing or glazing. By the way, the artist is very observant and detailed in executing this step of painting Drawgirl -- just look at the beginnings of "crows feet" around the corner of her eye. Of course, for vanities sake, the artist will later smooth them out and eliminate them for good for we all know women don't wrinkle. Wink.
Your coloring process continues still in... Step 27.
![]()
![]()
![]()
![]()
![]()
Go To Step 27
Return to Drawgirl Tutorial Home Page
Return to Home Page


