


|
How To Draw and Paint the Speed Painting Called Drawgirl
|
 |
 |
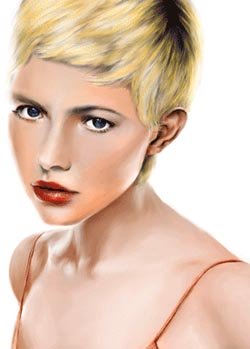
Using either soft vine charcoal, compressed charcoal, graphite pencil, carbon pencil, Conte' crayon, or pastel pencil, begin by drawing an accurate oval shaped sketch of Drawgirl's three-quarter turned head. As you become more experienced, you can skip drawing the complete oval, as can be seen, here. Note, the careful indication of the jaw line and bottom of the chin. Also, be aware that your oval drawing cuts in front of the ear and does not include the back of the head.
Carefully, split the oval in half (dividing top and bottom halves) by placing the eye line at the correct angle. Likewise, construct the angle of the nose. This is still the initial and tentative stage of the portrait, but, it is vital that you get as relatively close shape resemblance as possible. You do not want to have to try and make corrections later on when you are too far gone and have to stop and start over from scratch. Your support, which is a fancy way of saying paper, can be either a pastel sheet, velour paper, or watercolor board. To give a little cushion to your feel as you are painting, stack a dozen or so sheets together if you choose to draw on pastel paper.
Most art books and art teachers seem to start a portrait likeness by drawing an oval or egg shape. I prefer, however, to use the ball and plane method independently developed by Andrew Loomis and Ms. E. Grace Hanks during the 1930's. I do that when I am copying from a photo or making up a person in my mind. On the other hand, when drawing from life, I find it much easier to draw the face, features and head from the inside out, as advocated by portrait artist, Daniel Greene.
If you are pleased with your depiction of Drawgirl so far, then move on to the next step of marking the placement of the rest of the features and visible portion of her body composed in the portrait in step 2.
The light strokes to be placed in steps 26 through 36 are in preparation for the skin tone (which is darker) that will be carefully blended in later steps. And even though the rule in pastels is to paint the lights over dark, in this case, the process is reversed in that you paint dark over light. Actually, what you are really doing is priming the board, the support. Think of it as an underpainting of sorts. I discovered years ago, from watching a pastel portrait "how-to" video by master pastellist John Solomon Sandridge, that if you want the highlights to appear crisp and clear in the final result, you have to paint them first, then, paint the skin tones over top of them, and finally paint the same highlights over top of that. This is especially true when painting pastels on watercolor board. Even though the video does not explain the reasons behind actions (for example, the highlights trick), I just figured out most things by viewing it repeatedly for months. Later on, I discovered that the "trick" is a modified version of what is called "burnishing" or "superimposing" or "glazing." You will learn all about burnishing beginning in step 26.
Besides, priming the board, this has the added benefit of keeping the face smooth looking, as opposed to blotchy looking, when priming/blending. When blending, be sure to do so from light to dark and in tiny squigly, pig-tail like motions with your pinky or paper stomp. I learned that technique when I was a child by watching the original TV artist, Jon Gnagy, with his show, "Learn To Draw" when television was relatively new and programs were still being broadcast in black & white back in the 1950's. For example, use those motions, beginning under the eye from side to side while gradually moving downward into the cheek area. Wipe your finger with a cloth or paper towel every stoke or two, or else you will place the darker color into the ligher area, which will be difficult to correct.
![]()
![]()
![]()
