


|
How To Draw and Paint Drawgirl
|
 |
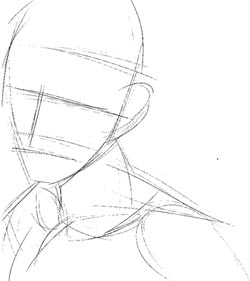 |
We continue by sealing the oval over her head -- actually, we are indicating the hair of Drawgirl. The eye line and nose line angle were established in step 1, now, the placement of the rest of the features are roughly located. The bottom of the nose is about half way between the eye line and the bottom of the chin. The center of the mouth is about 1/3 the distance between the bottom of the nose and the bottom of the chin. Even though not indicated in the drawing, you may find it easier to place the bottom of the bottom lip (yes, you read that right - "bottom of bottom" or "bottom of lower" lip) half way between the bottom of the nose and the bottom of the chin. Half is easier to define than one-third. If the model was posed in a front view, with her eye level (horizon line, if this was a landscape painting) perfectly horizontal, then, you could see both of her ears, and the top of her ears would be level with her eyebrows, and the bottom of her ears would be level with the bottom of her nose. Since she is posed otherwise and with a tilt, then her visible ear is shifted slightly upwards. The back of her head is still not indicated at this stage.
If this were a profile view, you would see that the back of her neck would travel downward at an angle from a horizontal line level even with the bottom of her ear and extending to the back of her head. Here, is shown more or less the same placement of the cylindrical shaped neck. You can see the follow-through of the cylinder with the elipse drawn at the base of her cylinder shaped neck. Likewise, with the cylindrical shape of the visible portions of her arms. The follow-through elipse of one of her arms is clearly seen under her chin. Not only that, but it serves a secondary purpose of isolating the brightly lit area on her shoulder, which will be of significant use a few steps, later.
Now, on to the final drawing stage where it really gets interesting in... Step 3.
![]()
![]()
![]()
![]()
![]()
Go To Step 3
Return to Drawgirl Tutorial Home Page
Return to Home Page
