


|
How To Draw and Paint Drawgirl
|
We continue this tutorial of Drawgirl by explaining and illustrating the fourth step this pastel portrait.
 |
 |
Instead of grabbing your glorified colored chalks and plastering so-called flesh colors all over the face of Drawgirl, you are going to use a trick developed by the old masters in their oil paintings; that is, you are going to make a value, or tonal (black & white), underpainting. If you have never thought of making a tonal underpainting for pastel portraits, before, you are in for a treat.
One of the challenges facing the pastel artist is the inability to achieve sartisfying darks. That is why most people think of bright colors when they think of pastels. To help overcome this limitation, a dark tonal underpainting is advantageous.
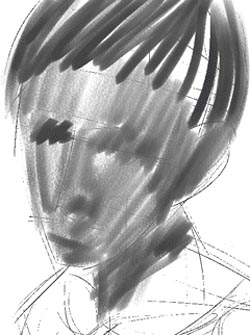
In painting their oil paintings, the old masters would first decide if the painting would have 3, 4, 5 or whatever amount of values from dark to light. Specifically, they would deliberately limit themselves to 3 or 4 values, because 2 values or less would look too flat and 5 and more would be too confusing. For example, light, medium and dark plus highlight shades for a total of four tones. Squint your eyes at the model and see if you can do the same. Then, from your set of ten or more gray pastel sticks, select the four shades you observed and chose for the portrait by squinting and applying them to your painting as depicted in this drawing using arty straight lines. Don't panic if your decision seems different from what is shown here. For instance, the model's hair is blond, yet the tone in the drawing is very dark. Relax. The reason is because a bass black is needed to make the treble white (or blond) pop when the portrait is complete. Remember, the rule in pastel painting is... "light over dark." This also explains why a tonal underpainting is so effective.
After that is done, then strategically smudge selected areas with your finger. But before doing so, carefully note the most minimal attempt at indicating the model's upper left eyelid and eyeball at this stage. With that observation, you are now free to smude.
Your tonal drawing continues in... Step 5.
![]()
![]()
![]()
![]()
![]()
Go To Step 5
Return to Drawgirl Tutorial Home Page
Return to Home Page
